Mostrando postagens com marcador Blueprints. Mostrar todas as postagens

sábado, 12 de outubro de 2024

Translations of my Blueprints/UE5 book

The purpose of this post is to share with you the joy I feel when I see my book Blueprints Visual Scripting for Unreal Engine 5 being translated and published in other languages.

This is the result of many years of work with Unreal Engine that started with my tutorials on programming in UnrealScript:

https://romerounrealscript.blogspot.com/p/table-of-contents.html

It was something I started without any pretensions but which generated opportunities that I decided to dedicate myself to.

My book was published in 2022:


The Korean version was published in 2023:


The Chinese version was published in 2024:


Translation into Russian is underway.


Currently, the focus of my studies is on the new Verse programming language. It is part of UEFN (Unreal Editor for Fortnite) but later it will be available in the standard Unreal Engine editor.

This is the link to my Verse language tutorials:

https://romeroblueprints.blogspot.com/p/table-of-contents-verse.html 


Traduções do meu livro de Blueprints/UE5

O objetivo desta postagem é compartilhar com vocês a alegria que eu sinto ao ver o meu livro em inglês Blueprints Visual Scripting for Unreal Engine 5 ser traduzido e publicado em outras línguas.

Isto é resultado de um trabalho de muitos anos com a Unreal Engine que iniciou com os meus tutoriais sobre programação em UnrealScript:

https://romerogames.blogspot.com/p/sumario-unrealscript.html

Foi algo que comecei sem pretensão mas que gerou oportunidades que decidi me dedicar.

O meu livro foi publicado em 2022:


A versão Coreana foi publicada em 2023:


A versão Chinesa foi publicada em 2024:


A tradução para Russo está em andamento.


Atualmente, o foco dos meus estudos está na nova linguagem de programação Verse. Ela faz parte do UEFN (Editor do Unreal para Fortnite) mas posteriormente estará disponível também no editor padrão da Unreal Engine.

Este é o link dos meus tutoriais da linguagem Verse: 

https://romeroblueprints.blogspot.com/p/sumario-verse.html


segunda-feira, 24 de julho de 2023

Book update: Blueprints for Unreal Engine 5


A book about technology has the disadvantage of being stuck in time while technology changes at a rapid rate.

The purpose of this article is to point out the main sections of the book that were impacted by changes in Unreal Engine 5 and to show how to adapt to these changes.

If you don't know my book, see the book description on Amazon.com:

Blueprints Visual Scripting for Unreal Engine 5


This book was a project that required a lot of dedication from me, but I'm glad I accepted the challenge.

The book was successful in many ways and what I love the most is the great feedback I get from readers and instructors.

The book was translated into Korean and published in March 2023:

Blueprints UE5 Korean edition


The book is also being translated into Chinese and it will be published in 2024. 


UPDATES


I'll separate the updates using bullet points and present the changes that made the most impact first.

The first tip for those who are having difficulty making the examples in the book is to download the source code available on GitHub:

https://github.com/PacktPublishing/-Blueprints-Visual-Scripting-for-Unreal-Engine-5

Click the Code button and then on Download ZIP:


The source code has the templates that are being used in the book and all the examples are working. 


  • Templates changes

In the examples of the book I use the First Person and Third Person templates a lot. Epic Games modified these templates. These changes do not affect the examples that create new Blueprints, but affect the examples that modify the Blueprints of these templates.

Part 2 and part 3 (chapters 5 to 12) of the book consist of the step-by-step  development of a game based on the First Person template.

My suggestion is to get the chapter 5 project from the source code and keep following the book using this project until chapter 12, because you will find in the project everything that are shown in the images of the book.


  • Offset problem in Blueprints of Starter Content (v5.2)

In version 5.2, some Blueprints from the Starter Content, such as Blueprint_Effect_Fire and Blueprint_Effect_Explosion,  are not appearing in the correct location when instances are created using the Spawn Actor from Class node.

Someone at Epic Games removed the root scene component of these Blueprints to use the particles component as root, but the relative location of the particles component didn’t change to (0,0,0).

To adjust these Blueprints, it is needed to add a scene component and set it as the root component. After that, set the correct 0,0,0 location in the particles component.


  • Chapter 4: Casting in Blueprints example

The Casting example is missing a step. It's on page 77 of the paperback version.

The new BP_GameModeWithScore Blueprint has to be edited in Class Defaults setting Default Pawn Class to BP_ThirdPersonCharacter.


  • Timeline track buttons

In the Timeline editor there were separate buttons with a letter for each track. Now there is a +Track button that opens a submenu with the tracks available.


  • Make Noise node

It is recommended to add the Self node in the Noise Maker parameter of the Make Noise node. See figures 10.18 and 10.20 of the book.


  • Accessing the BP_Weapon_Component (new template) 

This tip is if for those who are using the new First Person template. The rifle is represented by a generic BP_Weapon_Component Blueprint. The next steps show how to create a reference to the BP_Weapon_Component in the BP_FirstPersonCharacter Blueprint.

1. Create a variable of type BP_Weapon_Component (Object Reference) on the Blueprint BP_FirstPersonCharacter and compile the Blueprint.


2. Open the BP_Pickup_Rifle Blueprint, drag a wire from the output blue pin of SET First Person Character Reference and add the node SET BP Weapon Component. Connect the Return Value pin of Add BP Weapon Component to the input pin of the SET node.


3. Now you can access the BP_Weapon_Component anywhere using the nodes  of the next image.



quarta-feira, 30 de janeiro de 2019

Blueprint Instructors’ Guide


In 2018 Epic Games hired me to write the official Blueprint Instructors’ Guide. The guide has already been published. The link below has the description of the material and an interview they did with me.

UE4 Blueprint Instructors’ Guide is now available

Guia do Instrutor de Blueprint


Em 2018 a Epic Games me contratou para escrever o Guia Oficial do Instrutor de Blueprint. O guia já foi publicado. O link abaixo tem a descrição do material e uma entrevista que eles fizeram comigo.

UE4 Blueprint Instructors’ Guide is now available

sexta-feira, 16 de junho de 2017

BP Compendium 3: Execute Console Command

Execute Console Command


Blueprint function that allows the execution of a console command. Console commands are text-based commands that can be executed in the editor or in the game.


Input
  • Command: Console command that will be executed.
  • Specific Player: Optional. Reference to a Player Controller that will receive the command.


Example Usage: 

In a simple game, the level will be restarted when the player dies. This is done using a custom event named "Death" that executes the console command "RestartLevel".

Click to enlarge

For a complete list of console commands, open the "Output Log" window (Window → Developer Tools → Output Log). The line at the bottom of the window is for entering console commands. Enter the "DumpConsoleCommands" command and press Enter to get the list of commands.

Click to enlarge


Compêndio BP 3: Execute Console Command

Execute Console Command


Função blueprint que permite a execução de um comando de console. Comandos de console são comandos em formato texto que podem ser executados no editor ou dentro do jogo.

Entrada
  • Command: Comando de console que será executado.
  • Specific Player: Opcional. Referência a um Player Controller que receberá o comando.


Exemplo de uso: 

Em um jogo simples, o nível será reiniciado quando o jogador morrer. Isto foi feito usando um evento customizado com o nome "Death" que executa o comando de console "RestartLevel".

Clique para aumentar

Para obter uma lista completa dos comandos de console, abra a janela "Output Log" (Window→ Developer Tools → Output Log). A linha na parte de baixo da janela é para inserir comandos de console. Coloque o comando "DumpConsoleCommands" e pressione Enter para obter a lista de comandos.

Clique para aumentar


quarta-feira, 14 de junho de 2017

BP Compendium 3: AI Move To

AI Move To


The "AI Move To" action is used to move a Pawn/Character. The destination can be a location or another actor. The level must have a "Nav Mesh Bounds Volume" to define the area that the "AI Move To" action can use. It is a latent action, so it runs in parallel to the normal flow of execution of the Blueprints.

Input
  • Pawn: Reference to the Pawn/Character that will be moved.
  • Destination: Vector indicating the destination.
  • Target Actor: Reference to an actor to be used as destination.
  • Acceptance Radius: Maximum destination distance to complete movement.
  • Stop on Overlap: Boolean value. If true, complete the move as soon as the Pawn begins to overlap the "Acceptance Radius".

Output
  • On Success: Execution pin that will be activated when and if the "AI Move To" manages to reach the target.
  • On Fail: Execution pin that will be activated if the destination can not be reached.
  • Movement Result: Enumeration that indicates the result of the movement.

Example Usage: 

The image shows the "AI Move To" action being used for a Pawn to follow a path represented by a set of predefined points on the level. These points representing the path may be stored in an array. The "FindNextPoint" macro is responsible for picking the next point in the path and storing it in the "Next Point" variable.

Click to enlarge

The clock icon indicates that "AI Move To" is a latent action. The event "GoNextPoint" starts the "AI Move To" action, but only when the Pawn reach the destination is that the actions connected to the pin "On Success" will be performed. After the "FindNextPoint" macro updates the "Next Point" variable, the "GoNextPoint" event is called again.


Compêndio BP 3: AI Move To

AI Move To


A ação "AI Move To" é usada para movimentar um ator do tipo Pawn/Character. O destino pode ser uma posição ou outro ator. É necessário ter um "Nav Mesh Bounds Volume" no cenário para definir a área que a ação "AI Move To" pode usar. Ela é uma ação latente, ou seja, executa em paralelo ao fluxo normal dos blueprints.

Entrada
  • Pawn: Referência ao Pawn/Character que será movido.
  • Destination: Vetor indicando o destino.
  • Target Actor: Referência a um ator que será usado como destino. 
  • Acceptance Radius: Distância máxima do destino para concluir o movimento.
  • Stop on Overlap: Valor booleano. Se for verdadeiro, conclui o movimento assim que o Pawn começar a sobrepor o "Acceptance Radius". 


Saída
  • On Success: Pino de execução que será ativado quando e se o "AI Move To" conseguir chegar no destino.
  • On Fail: Pino de execução que será ativado se não for possível chegar ao destino.
  • Movement Result: Enumeração que indica o resultado do movimento.


Exemplo de uso: 

A imagem mostra a ação "AI Move To" sendo usada para que um Pawn siga um caminho representado por um conjunto de pontos predefinidos no cenário. Estes pontos que representam o caminho podem estar armazenados em um array. A macro "FindNextPoint" é responsável por pegar o próximo ponto do caminho e armazenar na variável "Next Point". 

Clique para aumentar

O ícone do relógio indica que "AI Move To" é uma ação latente. O evento "GoNextPoint" inicia a ação "AI Move To", mas somente quando o Pawn chegar no destino é que as ações ligadas ao pino "On Success" serão executadas. Depois que a macro "FindNextPoint" atualiza a variável "Next Point" o evento "Go Next Point" é chamado novamente.


domingo, 11 de junho de 2017

BP Compendium 3: Spawn Emitter at Location

Spawn Emitter at Location


Plays a particle system at the specified location.

Input
  • Emitter Template: Particle system template that will be used.
  • Location: Location where the particle system will be created.
  • Rotation: Rotation used by the particle system. 
  • Auto Destroy: Boolean value. If true, it destroys the particle system when execution is complete.

Output
  • Return Value: Reference to the particle system component that was created.

Example Usage

The image below is from a blueprint that represents a "Bullet". When this bullet collides with something a particle system will be created at the collision location using the "P_Explosion" template. After this the bullet is destroyed.

Click to enlarge

In another example, a particle system is created when an actor overlaps a blueprint and is destroyed when an actor ends the overlap. The reference to the particle system created is saved in the "Emitter Reference" variable. The particle system template "P_Sparks" that was used is looped and does not stop running automatically.

Click to enlarge


Compêndio BP 3: Spawn Emitter at Location

Spawn Emitter at Location


Executa um sistema de partículas na localização especificada.

Entrada
  • Emitter Template: Modelo de sistema de partículas que será utilizado.
  • Location: Posição onde será criado o sistema de partículas.
  • Rotation: Rotação usada pelo sistema de partículas. 
  • Auto Destroy: Valor booleano. Se for verdadeiro, destrói o sistema de partículas quando a execução for concluída.

Saída
  • Return Value: Referência ao componente de sistema de partículas que foi criado.

Exemplo de uso

A imagem abaixo é de um blueprint que representa uma "Bala". Quando esta bala colidir com algum obstáculo será criado no local da colisão um sistema de partículas usando como modelo o "P_Explosion". Depois disto a bala é destruída.

Clique para aumentar

Em outro exemplo, um sistema de partículas é criado quando um ator sobrepõe um blueprint e é destruído quando um ator encerra a sobreposição. A referência para o sistema de partícula criado é salva na variável "Emitter Reference". O modelo de sistema de partículas "P_Sparks" que foi usado se mantém em loop e não encerra sua execução automaticamente.

Clique para aumentar


quarta-feira, 7 de junho de 2017

BP Compendium 3: Add Child Actor Component

Add Child Actor Component


Adds an Actor as a component of another Actor. Thus the component actor follows the transformations of the parent Actor. When the parent Actor is destroyed, the Actor component will also be destroyed. The new actor's class must be specified in the "Details" tab of the "Add Child Actor Component" function.

Input
  • Target:  Reference to the Actor who will own the new component.
  • Manual Attachment: Boolean value. If false, the new Actor will be automatically attached. 
  • Relative Transform: Transformation used by the new component.

Output
  • Return Value: Reference to the created Actor.

Example Usage: 

In this example we have a blueprint that represents a weapon. The name of this blueprint is "WeaponBlueprint". In another blueprint that represents a character of the game there is an event that will be called during the game to add a weapon of type "WeaponBlueprint" to the character.

Click to enlarge

The image below shows the "Details" tab of the "Add Child Actor Component" function that is displayed when the function is selected. The class that will be used by the new actor must be informed in the "Child Actor Class" property.


Table of Contents

Compêndio BP 3: Add Child Actor Component

Add Child Actor Component


Adiciona um Ator como componente de outro Ator. Desta forma o ator componente segue as transformações do Ator pai. Quando o Ator pai for destruído, o componente Ator também será destruído. A classe do Ator a ser criado deve ser especificado na aba "Details" da função "Add Child Actor Component".

Entrada
  • Target:  Referência ao Ator que possuirá o novo componente.
  • Manual Attachment: Valor booleano. Se for falso, o novo Ator será anexado automaticamente. 
  • Relative Transform: Transformação usada pelo novo componente.

Saída
  • Return Value: Referência ao Ator criado.

Exemplo de uso: 

Neste exemplo temos um blueprint que representa uma arma. O nome deste blueprint é "WeaponBlueprint". Em outro blueprint que representa um personagem do jogo existe um evento que será chamado durante o jogo para adicionar uma arma do tipo "WeaponBlueprint" ao personagem.

Clique para aumentar

A imagem abaixo mostra a aba "Details" da função "Add Child Actor Component" que é exibida quando a função está selecionada. A classe que será usada pelo novo ator deve ser informada na propriedade "Child Actor Class".


Sumário

quinta-feira, 1 de junho de 2017

BP Compendium 3: Get Overlapping Actors

Get Overlapping Actors


This function returns a list of actors that are overlapping the Actor/Component. There are two versions of this function, one that uses an Actor as Target and the other that uses a Component as Target.


Input
  • Target:  Reference to the Actor/Component that will be used in the overlapping test.
  • Class Filter: Optional. Indicates which class/subclasses will be used in the test.

Output
  • Overlapping Actors: Array containing the Actors that are overlapping the Actor/Component.


Example Usage: 

Imagine an area that deals damage to all the actors in it. This area is represented by a Blueprint that has a Box Collision component that defines the location where the actors suffer damage. The event below is periodically called to apply damage to all actors who are overlapping the Box Collision.

Click to enlarge

The image below shows the Timer that was set to call the "Timer Damage" event once per second.

Click to enlarge


Compêndio BP 3: Get Overlapping Actors

Get Overlapping Actors


Esta função retorna uma lista de atores que estão sobrepondo o Ator/Componente. Tem duas versões desta função, uma que usa como Target um Ator e a outra que usa um Componente como Target.

Entrada
  • Target:  Referência ao Ator/Componente que será usado no teste de sobreposição.
  • Class Filter: Opcional. Indica qual classe/subclasses serão usadas no teste. 


Saída
  • Overlapping Actors: Array contendo os Atores que estão sobrepondo o Ator/Componente.

Exemplo de uso: 

Imagine uma área que causa dano a todos os atores que estiverem nela. Esta área é representada por um Blueprint que possui um componente do tipo "Box Collision” para definir o local onde os atores sofrem dano. O evento abaixo é chamado periodicamente para aplicar dano a todos os atores que estão sobrepondo o "Box Collision".

Clique para aumentar

A imagem abaixo mostra o Timer que foi configurado para chamar o evento "Timer Damage" uma vez por segundo.

Clique para aumentar


terça-feira, 30 de maio de 2017

BP Compendium 3: Apply Damage

Apply Damage


This function is used to apply damage to an Actor. Various information related to the damage can be passed through the function. The hit Actor responds to this damage using the "AnyDamage" event.

Input
  • Damaged Actor: Reference to the Actor who will suffer the damage.
  • Base Damage: Value of float type that represents the damage.
  • Event Instigator: Optional. Reference to the Controller responsible for the damage.
  • Damage Causer: Optional. Reference to the Actor which caused the damage.
  • Damage Type Class: Optional. Class that represents the type of damage. E.g. Fire, Electricity.

Example Usage: 

This simple example can be used on a blueprint that represents a bullet. When the bullet hits an Actor, the "Apply Damage" function is used to deal a damage with a value of 20. After that the bullet is destroyed.

Click to enlarge

In the Actor Blueprint that was hit, a float variable with the name "Energy" was created. The "AnyDamage" event will be activated by the "Apply Damage" function. The damage is subtracted from the "Energy" variable. If "Energy" is less than or equal to zero, the Actor will be destroyed.

Click to enlarge

There are more specific versions such as the "Apply Point Damage" and "Apply Radial Damage" functions. For each of them there is an associated event.


Table of Contents

Compêndio BP 3: Apply Damage

Apply Damage


Esta função é usada para aplicar dano a um Ator. Diversas informações relacionadas ao dano podem ser passadas através da função. O Ator atingido responde a este dano através do evento "AnyDamage". 

Entrada
  • Damaged Actor: Referência ao Ator que será atingido.
  • Base Damage: Valor do tipo float que representa o dano.
  • Event Instigator: Opcional. Referência ao Controller responsável pelo dano.
  • Damage Causer: Opcional. Referência ao Ator que causou o dano.
  • Damage Type Class: Opcional. Classe que representa o tipo de dano. Ex: Fogo, Eletricidade.


Exemplo de uso: 

Este simples exemplo pode ser usado em um blueprint que representa uma bala. Quando a bala atinge um Ator, a função "Apply Damage" é usado para aplicar um dano com o valor 20. Depois disso a bala é destruída.

Clique para aumentar

No Blueprint do Ator que foi atingido, foi criada uma variável do tipo float com o nome "Energy". O evento "AnyDamage" será ativado pela função "Apply Damage". O dano é subtraído da variável "Energy". Se "Energy" ficar menor ou igual a zero o Ator será destruído.

Clique para aumentar

Existem versões mais específicas como as funções "Apply Point Damage" e "Apply Radial Damage". Para cada uma delas existe um evento associado.


Sumário

domingo, 21 de maio de 2017

BP Compendium 3: Actor Has Tag

Actor Has Tag


This function checks if a game Actor has a certain Tag. The use of tags is a simple way to differentiate some actors in the level.

Input
  • Target: Actor reference that will be used in the tag verification.
  • Tag: Tag that will be used in the test. 

Output
  • Return Value: Boolean value. If "true" indicates that the actor has the tag informed.

Example Usage: 

An Actor can have multiple Tags. To add Tags to an Actor in the Blueprints Editor, click the "Class Defaults" button and in the "Details" tab look for the "Actor" category.

The image below shows that a tag called "SpecialItem" has been added. Tags can also be added in the level editor, just click on an Actor that is on the level and modify the Tags in the "Details" tab.


In this example, the "Actor Has Tag" function is used to check if the actor has the "SpecialItem" tag. If it has then a new actor of "Special Game Item" type will be created, otherwise the actor created is a "Game Item" type.

Click to enlarge

Compêndio BP 3: Actor Has Tag

Actor Has Tag


Esta função verifica se um Ator do jogo possui uma determinada "Tag". O uso de tags permite uma forma simples de marcar alguns atores no nível. 

Entrada
  • Target: Referência ao Ator que será usado no teste da tag. 
  • Tag: Tag que será usada no teste. 

Saída
  • Return Value: Valor booleano. Se for "true" indica que o Ator possui a tag informada.

Exemplo de uso: 

Um Ator pode ter várias Tags. Para adicionar Tags a um Ator no editor de Blueprints, clique no botão "Class Defaults" e na aba "Details" procure a categoria "Actor". 

A imagem abaixo mostra que foi adicionada uma Tag chamada "SpecialItem". As Tags também podem ser adicionadas no editor de nível, basta clicar em um Ator que esteja no nível e modificar as Tags na aba "Details".


Neste exemplo, a função "Actor Has Tag" é usada para checar se o ator possui a tag "SpecialItem". Se possuir então será criado um novo ator do tipo "Special Game Item", senão o ator criado é do tipo "Game Item".

Clique para aumentar


quarta-feira, 10 de maio de 2017

BP Compendium 3: Map Range Clamped

Map Range Clamped


Converts a value that is in a range of values to the corresponding value in another range of values. The end result will always be in the range of output values even if the original value is outside the range of input values.

Input
  • Value: Original value to be converted.
  • In Range A: Minimum value of the input value range.
  • In Range B: Maximum value of the input value range.
  • Out Range A: Minimum value of the output value range.
  • Out Range B: Maximum value of the output value range.

Output
  • Return Value: Converted value to the output value range.

Example Usage: 

In the example below, a float variable is being used to represent the rotation of an object. This variable can contain values between 0.0 and 1.0. A function was created to convert the value of this variable to the equivalent value in degrees. If the value is 0.0 then the equivalent in degrees is 0. If it is 1.0 the equivalent in degrees is 360. If the value is 0.5 then the result will be 180 degrees.

Click to enlarge

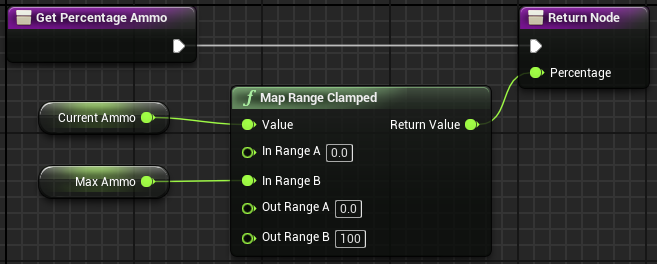
In another example, the "Get Percentage Ammo" function converts the current amount of the player's ammo into a percentage so it is displayed on the screen. The calculation is based on variables that hold the maximum ammunition that the player can have and the current amount of ammunition.

Click to enlarge

There is a variation of this function called "Map Range Unclamped", the only difference being that the end result is not limited to the range of output values.