Paper 2D is a system of the Unreal Engine 4 used to create 2D games based on Sprites. Sprite is an image that represents an object in a 2D game.
The main elements that are part of Paper 2D are Sprite, Flipbook and TileSet / TileMap. To add these elements to a project, click the "Add New" button of the Content Browser and look for the "Paper2D" category :
 |
| (version 4.8) |
Flipbooks are used to control the 2D animation based on sprites. Tile Maps are used to create 2D scenarios using Tile Sets.
The Paper 2D can be used in various ways:
- In the creation of a pure 2D game;
- In a 2D game with 3D backgrounds;
- As 2D elements in 3D games;
In upcoming articles we'll create an example of a pure 2D game using only Sprites. After that there will be an article about Flipbook and an article about TileSet / TileMap.
In this game, the player controls a red car and need to dodge the other cars of the street. The image below shows how will be the game.
 |
| Click to enlarge |
Create a new empty project without using the Starter Content:
 |
| Click to enlarge |
Create a new level (File->New Level) and choose "Empty Level":
Save the level with the name "Paper2dLevel". Access the "Edit->Project Settings..." menu and then choose the "Maps & Modes" option. In the "Default Maps" choose the level "Paper2dLevel".
Now let us import the images to be used in the game. First is the background image that is below. This image has the dimensions of 640x480 pixels.
 |
| Click to enlarge |
Save the image on your computer. Then click the "Import" button of the Content Browser and select the image. The editor will create a Texture, put the texture name as "Background".
Right-click on the texture and choose the option "Create Sprite" which is in the submenu "Sprite Actions":
A Sprite named "Background_Sprite" will be created. Double-click the sprite created to open the Sprite Editor:
 |
| Click to enlarge |
Look for the property "Pixels per unit" and verify that it is "1.0". If it is not, change it. Save and then close the sprite editor.
The image below will be used to create two Sprites that represent the cars in the game. Save the image and import to the editor.
Right-click the created texture and choose the "Apply Paper2D Texture Settings" option from the submenu "Sprite Actions":
 |
| (version 4.8) |
Then choose the "Extract Sprites" option from the submenu "Sprite Actions":
The editor will try to identify the Sprites based on transparency of the image. If it is correct, simply click the "Extract" button in the window shown below. If this is incorrect, you can change the "Sprite Extract Mode" property to "Grid" and manually configure the size of the sprites.
Rename the sprite of red car to "PlayerCar_Sprite" and the sprite of blue car to "EnemyCar_Sprite". Open these sprites in the Sprite Editor and confirm that the property "Pixels per unit" is "1.0".
We will put the background along the axes X and Z as follows:
The game area size is equivalent to the background which is 640x480. The street limits are defined by the values of X=160 and X=480.
Drag the "Background_Sprite" and drop anywhere in the Viewport of the editor. The editor automatically creates a "PaperSpriteActor". Change the value of "Location" of the Background to (X=320, Y=0, Z=240). This position represents the center of Sprite so that the bottom left of the Background stay on the origin (X=0, Y=0, Z=0) as the image above.
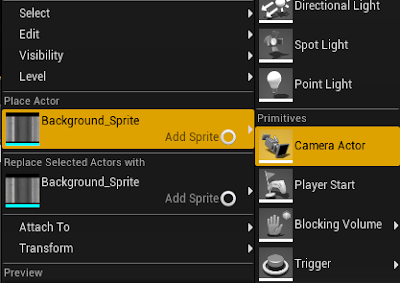
Right-click in the viewport and choose the "Place Actor -> Camera Actor" option to add a camera:
This camera will set the view of the game. Change the value of "Location" of the camera to (X=320, Y=500, Z=240). Rotate the camera in -90º in the Z axis so that it points toward the Background. The image below shows the camera in the editor with a preview of the scene that the camera is capturing.
In the camera properties, change the "Projection Mode" to "Orthographic". Set "Ortho Width" to 640 and in the "Aspect Ratio" click the combo box and select 640x480. On the property "Auto Activate for Player" click the combo box and choose "Player 0" for this to be the camera used by the game. This image shows the camera properties.
In the next articles, we will create the Blueprints that are part of the game.
Next: Paper 2D Game: The cars


